goDMD with simple stm32f407vet6 board

I recently baught a very cheap development board from a chinese seller on aliexpress. It is based on a st mirco controller stm32f407vet6 and has a couple of periphery devices already on board like sdcard reader, usb connector and also rtc support with battery already in place.

Just look at aliexpress for stm32f407vet6 an you get lots of results for boards around 10$ like this one.STM32F407VET6-entwicklungsboard

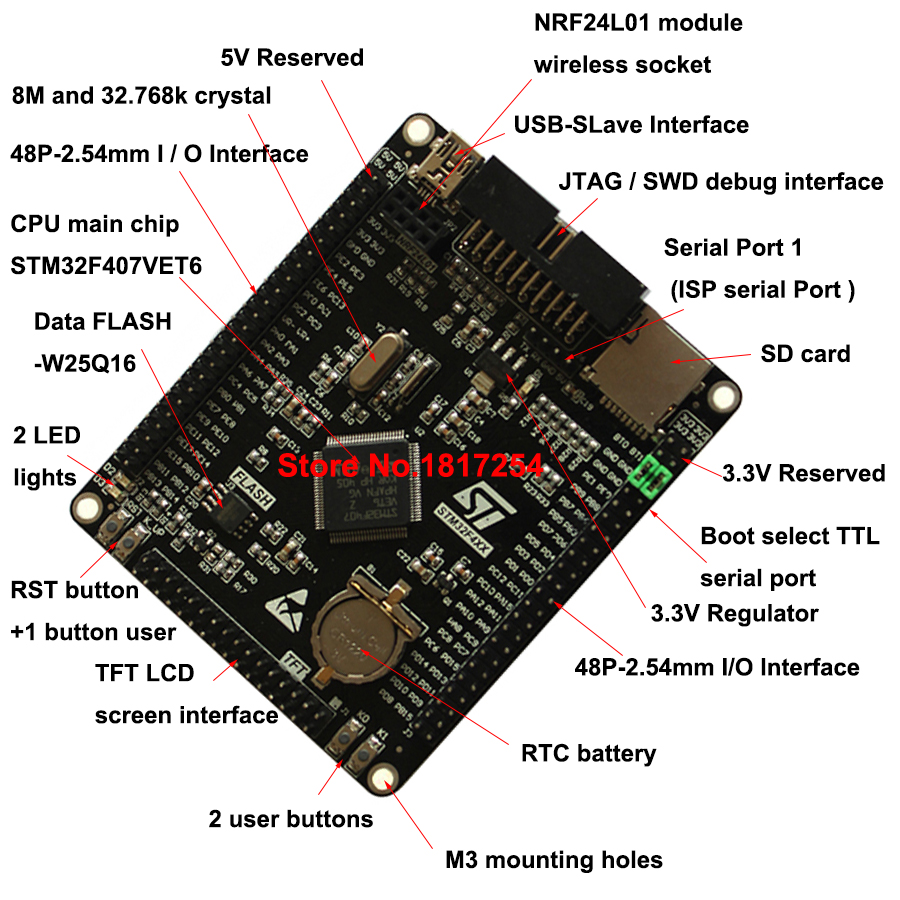
So I did a little research about technical documentation about that board and adjusted the actual firmware for the godmd stm32 version (rgb version). You can find the first functional release attached to this article and I will continue to release versions for this board at https://bintray.com/sker65/godmd-stm32/.

If you want to build a goDMD with this kind of development board, you simply need a custom cable or connector, that connects some of the board headers with the hub75 connector of the panels.

Hub75 pinout looks like this:hub75 (1)
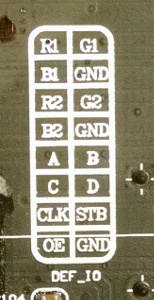
with R1 being pin 1 of the connector.

Connections needed:
HUB75:
OE = PA7
RGB Data (R1/G1/B1/R2/G2/B2) = PA0 – PA5
CLK = PA6
STB/Latch = PE11
Row A/B/C/D =  PE7 – PE10

If you want additionally sensors / remote control connected use:
DHT Data: PE5
IR Data: PE6
PIR Data: PC0 (zero)

And that’s basically it. Very cheap possibility to build a complete goDMD. Of course you need panels, power adapter and a case (see shop offers).

I’m also currently working on a new integration of wifi also for this board, but this needs some improvements on the firmware.

I’m currently working on a simple shield for that kind of board, that makes it even simpler to connect the panels with the board and the PSA. I will provide the gerber files as well, so you can either get a shield on your own or maybe I will offer some in the shop.

Nightly / Snapshot builds for this board can also be found: https://bintray.com/sker65/godmd-stm32/Firmware-VET6

Attachments:

Dieser Beitrag wurde unter Allgemein veröffentlicht. Setze ein Lesezeichen auf den Permalink.

50 Antworten auf goDMD with simple stm32f407vet6 board

  1. Gerbrand Rosendal sagt:

    Hallo Steve,

    Vielleicht ein dumme Frage, aber ich habe wenig Erfarung mit dieses Technik.
    Gibt es ein ‘Step by step’ Beschreibung wie mann die Firmware in das stm32f407vet6 board flasht?
    Ich habe die die von ihnen beschriebene Weise versucht mittels mphidflash aber ohne Erfolg. Auch via der STM32 ST-Link utility hat nicht gelungen.
    Wechle BIN oder HEX files brauche ich genau und wann braucht mann der SD karte?

    Grüßen, Gerbrand Rosendal, Niederlande

    • steve40 sagt:

      Hallo Gerbrand, dieses Board ist ein stm32 Board basierend auf einem Controller von STMicro. Dafür brauchst Du das st-flash / st-link Utility. Die Firmware findest Du hier https://bintray.com/sker65/godmd-stm32/Firmware-VET6. Das bin.gz Paket mit gzip -d auspacken und dann mit “st-flash –reset write godmd-stm32.bin 0x08000000″ flashen. Damit du über den JTAG port flashen kannst, brauchst Du noch so einen kleinen st-link / usb adapter, die man auf ebay bekommt. Such mal nach “st-link v2″ kostet nur ein paar Euro. Die Pinbelegung des JTAG Steckers findest Du im Internet, die ist normiert. Beim Flashen als Spannung (Vcc) immer die 3.3V nehmen und nicht 5V. SD Card brauchst Du im neuesten Build nicht mehr unbedingt, aber über SD Card kannst Du mehr Animationen oder andere Schriften hinzufügen.

      Gruß Stefan

      • Gerbrand Rosendal sagt:

        Hallo Steve,
        Vielen Dank für deine Antwort, das ist hilfreich. Ich habe der St-Link bestellt und werde dich weiter informieren ob ich erfolgreich bin. :-)

      • Holger Brandes sagt:

        Hallo Steve,

        Displays, st-link v2, stm32f407vet6 und Netzteil aus China beschafft. Nach Anleitung zusammen gebaut – Funktioniert Super!
        Vielen Dank. Ich hoffe mit der Firmwareentwicklung geht noch weiter.

        Gruß Holger

        • steve40 sagt:

          Super, freut mich. Für die Firmware wird es bestimmt noch weitere Updates geben. Ich bin nur aktuell mit verschiedenen Projekten beschäftigt …

          Gruß Steve

      • Randy Black sagt:

        I’m not quite certain of these instructions for flashing. From online sources, it looks like the four wires from the USB ST Link dongle adapter get connected to SWCLK, GND, SWDIO, and NRST of the JTAG connector. So, do you also connect a 5th wire from the dongle for the 3.3v to power the VET6 or do you plug into the USB port to power it during programming? Can someone clarify that for me?

      • Randy Black sagt:

        Hello Stefan,
        I am trying to program the firmware on a VET6 but not succeeding. Your st-flash commands appear to apply to Linux? I’m using Windows and the st-link_cli commands. Specifically, my flash command is: “st-link_cli -c -p godmd-stm32.bin 0x08000000″. When it runs, it loads the file to flash it, but then reports “Internal command error” and stops. Any suggestions?

        • steve40 sagt:

          I’m actually mostly on macOS and I’m not a windows specialist, but AFAIK there is a flash tool for windows from stm itself. just look for “flash stm” or “flash stm st-link”, your favourite search engine will guide you to the right place.

  2. Matthias Meyer sagt:

    Moin Steve,

    ist die aktuelle Firmware noch OS, steht die irgendwo zur Verfügung?
    Alle Links hier zeigen auf die alte pic32 Version.

    Gruß
    Matze

    • steve40 sagt:

      Nein die aktuelle Firmware ist nicht mehr OpenSource. Es gab leider Probleme mit Leuten, die sich nicht an die OS Lizenz-Vereinbarung gehalten haben und nach belieben Profit aus dem Projekt geschlagen haben. Aus welchem Grund bist Du denn an den Sourcen interessiert? Contributer sind natürlich trotzdem willkommen.
      Gruß Steve

  3. Frank sagt:

    Hallo Steve,

    kann man das VET6 auch mit der PIN2DMD firmware flashen? Sollte doch der selbe Controller wie auf dem Discovery Board sein oder sind hier zu wenig Ports rausgeführt?

    Gruß Frank

  4. Frank sagt:

    Super, vielen Dank.

    Gruß Frank

  5. Tobias sagt:

    Ist es eigentlich möglich, bunte Animationen auf der Uhr laufen zu lassen?
    Bei Pin2DMD werden die Animationen ja nachcoloriert und laufen auch über ein STM32 Modul, wenn ich das richtig sehe.
    Oder muss man einen Umweg über das Video Plugin gehen?

    Danke schonmal für die Antwort und danke für das phänomenale Projekt.

    • steve40 sagt:

      Ja man kann auch bunte Animationen laufen lassen und sie lassen sich auch mit dem pin2dmd Editor einfärben. Alternativ kannst Du “irgendwas” Buntes importieren z.B. mit dem Video-Plugin oder auch einfach animierte GIFs.

      Einziges Problem derzeit: die letzte Version hat keine dedizierte Exportfunktion mehr für die goDMD. Hat schon lange keiner mehr haben wollen.
      Was Du probieren kannst: Animation Speichern, im Animation Menü. Ich muss es mir anschauen.

  6. anthony sagt:

    Hello, sorry but if i want to flash esp12 ( esp8266 ) with vet6, which firmare must be used??? and, which is the latest firmware for vet6?? sorry for my english but im french and thanks for you go dmd :)

  7. Angel sagt:

    Hello Steve,

    I’m interested in building one of your clocks I have the card STM32F407VET6 the pannels and the power source. I’m spanish and I don’t understand German, sorry:(
    When I will start to building the clock there will be some doubts. The first one is, if with the software that I will program the card is everything to work? I will see the animatios and the time? I don’t need the shield? I just want to do something simple.
    Thanks and great job!

    • steve40 sagt:

      So the firmware already contains everything needed to run the basic clock functions. Although if you like to get more (and customized) animations or fonts you need to provide them with some files on the sd card (sd card reader is already included in the vet6 board).

      The shield basically helps to make all the connections easier, so you can go without, but then you need to take care for connecting all the board headers correctly to the rgb led panels.

      Br Steve

  8. Sebinouse sagt:

    Hi Steve,

    I’ve bought 2 F407VET6, and I would like to port a F429 Nucleo-144 program on it. As you have done the exact opposite, I was wondering if you kept the documentation and the differences somewhere. Feel free to contact me via email if needed or post the relevant content here. Thanks.

  9. anthony sagt:

    Hello, I have a problem with Temperature and DHT11….i have alway 200°C….I need a use DHT11 specially???

  10. Randy Black sagt:

    How do you generate a custom foo.ani file for the go-dmd? Tried to export godmd animation from the Pin2DMD editor, but it didn’t work.

    • Randy Black sagt:

      Anybody able to do this? Starting to think this is not even possible, but why the editor with go-dmd splash screen?

      • steve40 sagt:

        Which version of the editor are you using? For Ani export there is a export setting where you control the file formal version for export. Have you tried the different versions?

        • Randy Black sagt:

          Using a version 2.5.0.5 (dated Oct 18, 2018). I don’t understand “control export the file formal version for export”. Which version should I use?

        • Randy Black sagt:

          OK, I figured out that there are 6 “Ani Format version” settings in the configuration menu. Tried all 6 of them with and without “use old export format” checked, then when I “Export for goDMD”, no file is created. What is the secret to this?

          • steve40 sagt:

            Hey Randy, you finally convinced me to recheck for myself. Hold on ..

          • steve40 sagt:

            Hey Randy, today I took the time and looked into that. There was indeed a bug, the was effectively skipping file export. The latest builds on bintray should work and produce a file. Difference between the two format: RGB2 version also preserves palette informations. Useful especially if you want to display multi color animations.
            Br Steve

  11. Randy Black sagt:

    Steve,
    It does generate a file now, but when you try to open it in the editor to look at it, there is nothing in it (tried all 6 ani format versions with RGB2). Also, when you set the ani version and click OK, you can go right back into the config setting and the ani version you just set will no longer be there. Is there an older working version that we can use to generate the file?
    Randy

    • steve40 sagt:

      I tried for myself yesterday and it does create animation in the ani file. Of course you need to define some scenes to be exported.
      For goDMD there’s only 2 format variants possible as the export dialog shows. The older one (RGB1) is without custom colors in a palette, version 2 is with custom palette / colors.
      If it still does not work, you may need to describe more detailed what exactly your are doing, because to me it feels like a misunderstanding an how to use the editor tool in general.
      /Steve

      • Randy Black sagt:

        I have successfully used the editor to generate files to use on Pin2MD. Here is exactly what I am doing, so maybe you can tell me where I’m going wrong?
        1. Open the editor, load an .xml project that has recordings, scenes, keyframes, and palettes (this project was successfully used prior to generate .pal and .fsq files).
        2. Goto the configuration settings, choose an “Ani format version” (1-6), then hit “OK”.
        3. Bring up the “Export for goDMD” dialog box, choose a filename, choose “RGB Version 2”, then hit “Export”.
        The ani file is created. Now I would like to look at the contents of the file, so from the “Scene/Recording” menu, I choose “Load Scene(s)” and choose the ani file that I just created. Nothing happens. But if I load your original “foo.ani” file in the same manner, it shows all the scenes that are in it.
        Randy

        • steve40 sagt:

          When I do exactly the same thing all the new scenes get appended to the end of the scene list.

          Maybe you should clear you scene list in between by choosing “New Project” before loading. Or just try it in the goDMD-clock, which is what you finally want, isn’t it?

          If it still doesn’t work send me your ani file I will check it.
          /Steve

          • Randy Black sagt:

            You say “append”, so you are saving new scenes to the original foo.ani file? I was trying to make a new .ani file. I’ll try to do append and see if that works.

            Another question for you – at the top of the editor in the middle (where you can choose hash for keyframes), there is a “goDMD” tab that has such things as Cycle, Hold, FSK, transitions, Clock From, etc. Do I need to be using that and if so is there instruction on how to use it somewhere?
            Randy

          • steve40 sagt:

            Append means append to the list in the editor. To simplify things try it with just one single scene.
            Load a recording, cut a scene, export it for goDMD, close editor and reopen, then load the exported ani file.

            The other functions are not supported in the latest version.

  12. Randy Black sagt:

    I did exactly what you said with a single scene. The file was generated. Closed the editor. Reopened the editor and loaded the ani file. No scenes are in it. I can send the ani file to you – what is your email please?

    • Randy Black sagt:

      Steve,
      My apologies. It does indeed work now. The only thing that I was doing wrong was when I exported for godmd, I didn’t expressly name the file with the “.ani” extension. I assumed the program was saving it as that file type, but it was not. In fact it doesn’t save it with any file extension. So when you try to load it back into the editor, the editor doesn’t recognize it as an animation file and therefore ignores it and appears to do nothing. So all I had to do was rename the file with the “.ani” extension and now it works as it should. I apologize for all the confusion, but maybe someone else can learn from my mistake.
      Thanks for your patience,
      Randy

  13. Randy Black sagt:

    Steve,
    New question – what if my LED modules are RBG instead of normal RGB? Do I have to splice the ribbon cable to reverse the blue and green colors or is there a setting in the software that can account for it?
    Thanks,
    Randy

  14. Randy Black sagt:

    Another new question. Does anyone have a theory why this would work on a P5 pitch and not on a 2.5 pitch godmd (the 2.5 panels are confirmed to work in other system)?

    • Randy Black sagt:

      Anyone have a problem like this? Maybe once used on a certain type of panel, I need to re-flash to use on another type?

      • Randy Black sagt:

        Just to keep everyone informed. I learned from a forum that the chipset for the latest DMD panels has changed and so VET6 godmd will not work until firmware is updated. This is why my P2.5 panels do not work. In fact, any size panels with the modern chipset will not work, so don’t panic if nothing happens when you plug it in. Hopefully, Steve will be able to update his firmware soon to resolve the problem.

  15. Angel sagt:

    Hello, I have plugged everything as you post and I can see the system working but blurry, I see a lot of noise in the singal. It’s that becasuse of the voltage? The ST-Vet6 has to be powered with the mini-USB connector?
    Thanks.

    • Angel sagt:

      Cannot be powered by the mini-USB use the 5v pin in the upper irght and the GND pin under the 3,3v of the same row of pins.

Hinterlasse einen Kommentar zu Randy Black Antworten abbrechen

Deine E-Mail-Adresse wird nicht veröffentlicht. Erforderliche Felder sind markiert *

Du kannst folgende HTML-Tags benutzen: <a href="" title=""> <abbr title=""> <acronym title=""> <b> <blockquote cite=""> <cite> <code> <del datetime=""> <em> <i> <q cite=""> <s> <strike> <strong>